Creative Summer Party Flyer Template: Your Blueprint for Memorable Event Promotion
Picture this: You’ve planned the ultimate summer party—maybe a beach bash, a backyard barbecue, or a poolside soirée. The date is set, the playlist is ready, and the menu is locked. But when you look at your promotional materials, something feels off. The flyer you’re about to share looks generic, cluttered, or just plain boring. Sound familiar? That’s where a Creative Summer Party Flyer Template can turn things around.
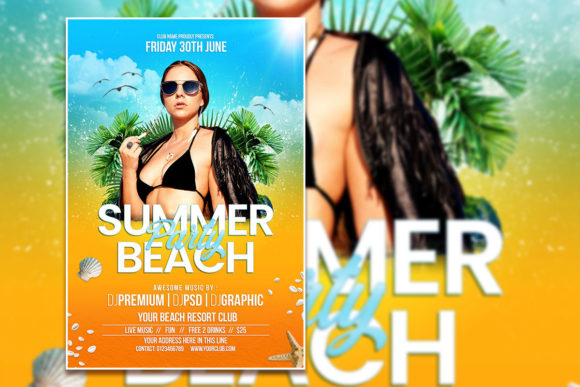
A template like this isn’t just a pretty picture. It’s a ready-to-use Editable Summer Party flyer template that gives you a professional head start. At 2000 x 3000 pixels, 300 dpi resolution, and RGB color mode, it’s built for both print and digital use. Whether you’re promoting a small gathering or a large community event, this PSD file—compatible with Adobe Photoshop—lets you swap text and images quickly. You can even replace the placeholder photo with your own for a truly customized look.
But here’s the thing: Even the best template can fall flat if you don’t use it wisely. Many people download a Summer Party Flyer Template and assume the job is done. In reality, a few common mistakes can undermine your results. Let’s walk through what those pitfalls are, why they matter, and how you can avoid them.
Mistake 1: Overlooking the Editable Layers
A Summer Party Social Media Post Template or flyer comes with organized layers. That means every element—background, text, shapes, images—is on its own layer. Beginners sometimes try to edit the wrong layer or flatten everything prematurely. This leads to frustration and a less polished final product.
Why this matters: When you work on the wrong layer, you may accidentally delete or distort elements you actually need. That can cause misaligned text, broken graphics, or color shifts. The result looks amateurish, which undermines the credibility of your event.
How to avoid it: Before you make any changes, take a few minutes to explore the Layers panel. Familiarize yourself with what each layer contains. Look for labels like “Background,” “Text Layer,” or “Image Placeholder.” When you want to change the font, simply select the text layer with the Text tool and replace the existing content. Don’t try to erase or paint over text—use the tool as intended. This small habit saves time and keeps your design intact.
Mistake 2: Ignoring Resolution and Color Mode
This template is set to 300 dpi and RGB color mode. Some users assume these settings are interchangeable. They might export the file in CMYK for print without converting properly, or they might lower the resolution to make the file smaller, not realizing it degrades quality.
Why this matters: If you print a flyer that was designed in RGB without conversion, colors can look washed out or muddy. Conversely, if you use 300 dpi for a web image, the file size may be unnecessarily large, slowing down load times. Either way, your flyer won’t look as intended.
How to avoid it: Know your output medium. For print, keep the 300 dpi and consider converting to CMYK before sending to a printer. For social media or web use, you can safely reduce the resolution to 72 dpi and keep it in RGB. The original PSD file gives you a high-quality starting point, so always work from a copy. That way, you preserve the master file for future edits.
Mistake 3: Forgetting to Replace the Placeholder Photo
The Summer Beach Party Editable PSD Template comes with a placeholder image. Some users leave it as-is because they don’t have a replacement ready. Others try to stretch or distort their own photo to fit, ruining proportions.
Why this matters: Generic stock photos rarely capture the personality of your event. If attendees see a flyer with a photo that doesn’t match the vibe—or worse, looks stretched and pixelated—they may not take your party seriously. The whole point of using a template is to personalize it, so skipping this step defeats the purpose.
How to avoid it: Take a good photo of the venue, the team behind the event, or a relevant scene like a decorated table or beach view. When placing it in Photoshop, use the “Place Embedded” command (File > Place Embedded). This brings the image in as a smart object, allowing you to scale it without losing quality. If your photo isn’t the exact shape, crop it first or use a mask to blend it naturally. The result will feel authentic and inviting.
Mistake 4: Using Too Many Fonts or Inconsistent Typography
A Photoshop Template - Instant Download often includes suggested fonts, but they’re just suggestions. Some users add their own fonts without considering readability or harmony. You might end up with three different script fonts and a bold sans-serif on the same flyer.
Why this matters: Typography is one of the first things people notice, even if they don’t realize it. Too many fonts create visual noise. It can look chaotic and hard to read—especially when your flyer needs to communicate key details like date, time, and location quickly.
How to avoid it: Stick to two or three fonts at most. Use one for headlines, one for body text, and optionally one for accents like a short quote or tagline. Make sure the fonts contrast well—pairing a clean sans-serif with a simple serif often works. If you’re unsure, use the fonts that come with the template as a starting point. You can always download free alternatives from reputable foundries, but test them in the layout first. Consistency builds trust.
Mistake 5: Neglecting Hierarchy and Spacing
The template comes with organized layers and a structured layout. But when you start editing, you might shift elements around or add text that disrupts the original balance. Suddenly, the most important information—like the event name—gets buried.
Why this matters: People scan flyers in seconds. If they can’t instantly see what the event is, when it’s happening, and where to go, they’ll move on. Good visual hierarchy guides the eye naturally. Poor spacing makes the design feel cramped or sparse, which can affect perceived value.
How to avoid it: Keep the strongest element—usually the event name—as the focal point. Use size, color, and placement to make it stand out. Leave breathing room around key information. If you need to add more text, consider reducing font size slightly rather than squishing everything together. Use the template’s original alignment as a guide. If something feels off, step back and check if the emphasis still lands where you want it.
What to Check Before You Download or Buy
If you haven’t purchased a Creative Summer Party Flyer Template yet, there are a few things worth verifying. First, confirm that the file format matches your software. This template is delivered as a PSD file for Adobe Photoshop. If you use a different program, you may need to convert it, and that can break layers or effects.
Second, check the license terms. Some templates restrict commercial use or require attribution. Others are free for any purpose. Knowing this upfront saves you from legal headaches later. Third, look at the included documentation. A good template often comes with a help file or at least clear layer naming. If the layers are a mess of generic labels like “Layer 1” and “Layer 2,” you might have a harder time editing.
Finally, consider the support. If you get stuck, can you ask the creator a question? Many marketplaces offer messaging or forums. A responsive creator can make the difference between a smooth edit and an abandoned project.
Practical Steps for a Flawless Edit
Let’s walk through a quick workflow so you can see how these tips come together.
- Open the PSD file in Adobe Photoshop. Make sure you’re using a version that supports layers (CS6 or later is fine).
- Go to the Layers panel. Identify the text layers, image placeholder, and background.
- Double-click the text layer with the Text tool. Delete the placeholder text and type your own. If you want a different font, select all the text and choose your preferred font from the menu. Keep it readable.
- For the photo, click on the image placeholder layer. Use “Place Embedded” to insert your own image. Scale and position it so it fits nicely within the frame.
- Adjust colors if needed. The template’s color mode is RGB, so if you’re printing, convert to CMYK at the end: go to Image > Mode > CMYK Color. Save a copy as a TIFF or high-quality PDF.
- Export for the appropriate platform. For social media, use Save for Web and choose JPEG or PNG. For print, use Save As and select PDF or TIFF with 300 dpi.
- Proofread everything before you save. Check the date, time, location, and contact details. One typo can confuse your guests.
By following this process, you turn a generic template into a custom piece that represents your event accurately. It saves you from starting from scratch and helps you avoid the most common editing errors.
Realistic Examples of Better Approaches
Imagine you’re hosting a beach party for friends and colleagues. You decide to use the Summer Beach Party Editable PSD Template. Instead of leaving the stock photo of a generic beach, you take a photo of the actual spot—maybe with a cooler and a surfboard in the foreground. That small swap makes the flyer feel personal and specific.
Or suppose you’re a small business owner promoting a summer sale. You use the template but keep the fonts simple: one bold sans-serif for the headline “Summer Sale Starts Friday” and a clean serif for the details. You resist the urge to add six different styles. The result is a flyer that customers can read at a glance.
Another example: A freelance event planner uses the template for multiple clients. By saving each version with a clear filename (like “ClientName_BeachParty_V2.psd”), they avoid mixing up files. This simple organizational habit saves time and prevents embarrassing mistakes like sending the wrong date to a client.
Small Details That Make a Big Difference
Sometimes it’s the little things that elevate a Summer Party Flyer Template from average to excellent. Consider adding a subtle drop shadow to text for better readability. Or align your text so it follows the natural flow of the image—if the photo has a horizon line, don’t place text directly over it. And always leave a small margin around the edges; printers often trim a few millimeters.
Also, think about the file size. If you’re sharing the flyer on social media, keep the file under 1 MB for quick loading. Use JPEG at 80% quality or PNG for images with transparency. For print, send the highest quality possible. A printer will thank you, and your flyers will look sharp.
Final Thoughts Before You Start
The Creative Summer Party Flyer Template is more than a download—it’s a tool that saves you hours of design work while giving you professional results. But like any tool, it works best when you use it with care. Avoid the common mistakes: editing the wrong layer, ignoring resolution, keeping the stock photo, overdoing fonts, and breaking the visual hierarchy.
Take a few extra minutes to prepare your text and images before you open the PSD file. Know your output channel. Test your colors. And if something doesn’t look right, step back and compare it to the original template—you’ll often spot the discrepancy quickly.
Whether you’re a seasoned designer or a first-time user, this template gives you a strong foundation. Use it thoughtfully, and your summer party promotion will look as good as the celebration itself.